
Inspired Icons
Inspired Icons
Finding a specific embroidery design within your personal collection can be a bit of a challenge, especially if you are an enthusiast sifting through thousands of designs. In the new 6D™ Embroidery System, finding embroidery and artwork has become easier than ever before, with the addition of the 6D™ Explorer Plug-In feature.
Now, simply browse to Windows® Explorer, change the View to Thumbnails (in any size), and ensure the Preview Pane is enabled, to see your designs as they will stitch. Right click over a design for a pop-up menu that lets you print a template, view design properties, or work directly with files to quickly Send Express  to stitch on your compatible machine,
Send
to stitch on your compatible machine,
Send  to the machine's memory, copy stitches to the clipboard
  ,
convert to a picture
,
convert to a picture  for emailing to a friend, or convert file types
  while also changing all threads to your personal preference, adding trim commands, tie-on and tie-off stitches, and much more!
In 5D™ Embroidery and 4D™ Embroidery, there is no Explorer plug-in. However, you can access designs via the Organizer software module, using a convenient viewing window that shows all the design and most of the graphic files in a folder, plus view design information if a single design is selected.
Module Mystique
Module Mystique
5D™ and 4D™ Organizer software has tools for working with one or many design files, and opening an embroidery design by a simple double-click. Working with embroidery files from the 6D™ Explorer Plug-In is very similar, but with multiple enhancements that make it truly a delightful process!

Once you browse to a folder in Windows® Explorer and find the design you want to customize, simply double-click on the thumbnail preview to open in the 6D™ Embroidery program window. Alternatively, you can click and hold the thumbnail and drag it down to any open 6D™ Embroidery, 6D™ Stitch Editor Plus, or other appropriate module's icon in the Windows® Taskbar to bring the program window forward. Then move the cursor into the 6D™ program window and release the design for true drag-and-drop functionality.
You may select multiple designs by holding the Control key on the computer keyboard. This allows you to drag and drop many designs at one time into a single program window, eliminating the need to open a browser viewer and page through multiple groups of designs. Fast, easy, and user-friendly are key words in the 6D™ Embroidery system!
Technique Tune-Up
Technique Tune-Up
Add a Foam Frame to your embroidery and then stitch over a craft foam sheet for a unique touch of texture and dimensionality. Once you have loaded an embroidery design into the hoop in the 6D™ Embroidery module, ensure the design you just loaded is surrounded with a select box.
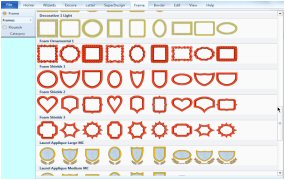
Now select the Frame tab in the new Ribbon Bar. (By ensuring the design is selected first, you know that the frame will ‘snap' to fit the selected design.) When the Frame Category is selected, the first set of Frames is visible in the new Gallery Viewer. Use the small arrows to scroll through the frames forward or backward, or the large arrow to drop down the Gallery Viewer and see all the frames in a scrolling menu.

Use the slider bar to scroll through the different Frame Categories until the Foam Frames are in view, and select the frame of your preference. The Gallery Viewer will close, and the frame will be selected in the smaller view window. Notice the settings are visible in the Ribbon bar so you may easily change the Margin (how close the frame will sit from the center of its stitches to the edge of the select box around the design) or Crop the design, Combine to ensure the frame and design are one element if desired, and more. To finish, click Apply for a perfectly placed frame, every time!
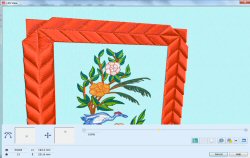
When you have finished framing your embroidery, don't forget to open Life View  from the Home tab or the Quick Access Toolbar, and use the Effects dialog
  to change the Frame's thread so you can see how the embroidery, stitched with Foam, will appear in a real life view!
 QuiltDesign Creator
QuiltDesign Creator

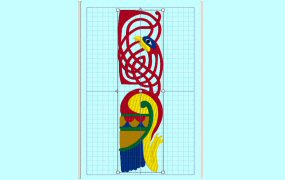
Signature quilts make great gifts for a wedding, graduation, birthday or new baby! Have all the invitees send their written signature, and scan them in black and white or monochrome mode to save in image files such as a .jpg or .emf files. A complete list of file types that may be used is available in the Help system.
In the New Design Wizard, select Load a Picture, and then Next. Select View Picture  to browse to one of the scanned signature images and load it. Select Next to Rotate if needed, and Next to adjust with Outline Finder and Expander as needed. Select Next again to Crop the image's blank background if applicable, and then Next to enter the Size by either Width or Height to fit in the block size you plan to use. Click Finish to bring the signature in as a background.
Use the FreeHand Draw  or Polygon Draw
  tools to trace over the background image. The Help system has great instructions for using each tool in the Drawing Panel. Other useful tools include
the Edit Node
tools to trace over the background image. The Help system has great instructions for using each tool in the Drawing Panel. Other useful tools include
the Edit Node  and Edit Line
  tools, Add Nodes
  or Delete Nodes
  , to fine-tune the shaping of the line that makes up the signature.
Save  a working .4qb file in case you want to make changes after you make a test stitchout of the quilted design. .4qb files preserve all the designing information used to create the finished quilting design, some of which can be removed depending on the type of finished file you export for stitching.
Finally, Export as a Quilting
a working .4qb file in case you want to make changes after you make a test stitchout of the quilted design. .4qb files preserve all the designing information used to create the finished quilting design, some of which can be removed depending on the type of finished file you export for stitching.
Finally, Export as a Quilting  or Embroidery
  design to stitch on your personal machine.
Fun Facts to Know and Tell
The Draw page in the 6D™ and 5D™ Design Creator software creates vector graphics using the .4qb format similar to the 5D™ QuiltDesign Creator Software, so you can transfer files from one package to another!
Best wishes from 6D™
PS: Create a few of your coming holiday gifts with your own personal signature as a unique identifier!

VANTAGE™ Embroidery Software Support is a membership program which provides education and support of the HUSQVARNA VIKING® & PFAFF 6D™, 5D™ and 4D™ Embroidery Systems, QuiltDesign Creator and TruEmbroidery™ Software for Mac® computers. The VANTAGE™ program is currently available in the US, Canada, and Australia. Please visit your authorized HUSQVARNA VIKING® or PFAFF® dealer to learn more and sign up today.
This month with VANTAGE™ Embroidery Software Support features Mastering Your Embroidery Software: "Selecting your Artwork for Digitizing ". In the Technology Corner, VANTAGE™ members will explore "Downloading Updates with Ease...".
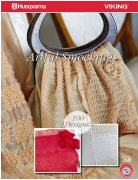
#268 Artful Smocking (920376096)
This HUSQVARNA VIKING® collection contains 100 embroideries! Use the INSPIRA® Fabric Magic or heat reactive thread as the bobbin thread together with light woven or soft fabrics to enhance the smocking effect. Use designs 1-42 with the Endless Hoop 170x100, designs 43-73 with the DESIGNER™ Royal Hoop 360x200 and design 74 with the Small Square Hoop 80x80.
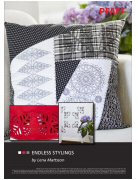
#469 Endless Stylings (821051096)
This new PFAFF® embroidery collection will surely inspire your creativity. The collection consists of a wide variety of designs. All of the endless embroideries are provided in three different versions: cutwork, chain stitch or quilt stitch. The recommended hoop to use with this collection is the creative™ GRAND ENDLESS HOOP 260x150.