
Inspired Icons
Inspired Icons
Selection tools help you to either capture your entire embroidery design, or just sections of it. In Embroidery / Embroidery Extra you select embroideries. In Stitch Editor / Stitch Editor Plus you select stitch points or groups of stitches. In Design Creator you select objects. Selection Tools can be found in a wide variety of the modules so let's see how these tools work.
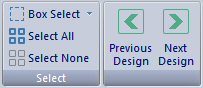
In 6D™ Embroidery / 6D™ Embroidery Extra  , the embroidery design selection tools can be found on the Home Tab.
(When using Box Select
, the embroidery design selection tools can be found on the Home Tab.
(When using Box Select  , Freehand Select
  ,
and Freehand Point Select
,
and Freehand Point Select  or
Polygon Select
or
Polygon Select  , the entire embroidery must be selected or it will not be included in the selection.)
- Click on a design to select it.
- To select multiple embroideries, press the Control key then click on other embroideries one by one.
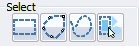
- Use Box Select to capture embroideries in a rectangular area. Choose Box Select , then drag completely around the embroidery designs you want to select.
- To select all designs choose Select All
 or press Ctrl + A.
 - To deselect all designs choose Select None
 or press Shift + Ctrl + A on any tab.
 - Use Freehand Select to select embroideries within an area of any shape. From the drop-down next to Box Select, choose Freehand Select, then drag to draw an irregular outline around the desired embroideries. When you release the mouse the area is closed automatically.
- Use Freehand Point Select to select embroideries within an area of any shape. From the drop-down next to Box Select, choose Freehand Point Select, then click a series of points to create an outline around the desired embroideries. When you have surrounded the desired embroideries, right-click to close the selection.
New to the 6D™ Embroidery System are Next Design  and
Previous Design
and
Previous Design  . These tools allow you to toggle between the designs in the order they were placed into the design area.
5D™ Embroidery / Embroidery Extra have similar embroidery selection tools located in the Toolbar at the top of the work area. Most are located in the Select All  drop-down list.
4D™ Embroidery / Embroidery Extra did not have embroidery design selection tools in the main work area as you can only select one embroidery design at a time.
However, there are selection tools available on the Edit Tab for working with individual stitches in 6D™ / 5D™ / 4D™ Embroidery Extra.
drop-down list.
4D™ Embroidery / Embroidery Extra did not have embroidery design selection tools in the main work area as you can only select one embroidery design at a time.
However, there are selection tools available on the Edit Tab for working with individual stitches in 6D™ / 5D™ / 4D™ Embroidery Extra.

In 6D™ Embroidery Extra, the stitch point selection tools can be found on the Edit Tab of the Ribbon Bar. (In 5D™ / 4D™ Embroidery Extra they are in the Control Panel.) In this area you work with stitch points within an embroidery design. When working with stitches the selection tools are a bit different.
- Box Select, Freehand Select and Freehand Point Select (Polygon Select in 5D™ / 4D™ Embroidery Extra) no longer need to surround an entire design. They select groups of stitches.
- In 6D™ Embroidery Extra, the Select Stitches tool selects an individual stitch or series of stitches. In 5D™ / 4D™ Embroidery Extra you just click on the stitch point to select.
- Make Block From Visible Area
 is a one-click function that selects all visible stitches in the current embroidery. This is like Select All in 6D™ / 5D™ Embroidery.

In 6D™ Stitch Editor Plus  the selection tools are found on the Toolbar and work like the tools on the 6D™ Embroidery Extra Edit Tab. (In 5D™ Stitch Editor Plus
and 5D™ / 4D™ Stitch Editor they are found on the Design Tab of the Control Panel.) There is one additional selection tool not found within Embroidery Extra,
Color Block Select
the selection tools are found on the Toolbar and work like the tools on the 6D™ Embroidery Extra Edit Tab. (In 5D™ Stitch Editor Plus
and 5D™ / 4D™ Stitch Editor they are found on the Design Tab of the Control Panel.) There is one additional selection tool not found within Embroidery Extra,
Color Block Select  .
This will select all of the connected stitches by thread color. After clicking Select Color , click a visible thread color within the embroidery design. Note:
If the same color is used elsewhere within the design as a different color change it will not be selected as the stitches are not connected.
.
This will select all of the connected stitches by thread color. After clicking Select Color , click a visible thread color within the embroidery design. Note:
If the same color is used elsewhere within the design as a different color change it will not be selected as the stitches are not connected.
In 6D™ / 5D™/ 4D™ Design Creator  the Selection Tools can be found on the Edit Page of the control panel.
- Box Select , Freehand Point Select , Make Block From Visible Area , and Freehand Select work the same as the other modules, however they are selecting objects and not individual stitch points or embroidery designs. Only objects that are completely enclosed by the selection line will be selected.
- 5D™ / 4D™ Design Creator have Polygon Select instead of Freehand Point Select.
- To select the last visible object displayed in the FilmStrip use the Select Last Visible Object
 function (6D™ Design Creator only). It is located at the bottom of the FilmStrip, or click Select Last Visible Object from the Object Menu.
The selection tools available in the 6D™ / 5D™ / 4D™ Embroidery Systems will allow you to easily move, delete, rotate, mirror, reposition, resize, scale or distort entire embroideries or just sections within the design. Selection tools are usually used in combination with the many other tools available with the software so have fun experimenting!
Module Mystique
Module Mystique

5D™ Stitch Editor Plus or 5D™ / 4D™ Stitch Editor modules are very powerful modules when you want to edit existing embroidery designs,
but 6D™ Stitch Editor Plus is even better!
Not only can you open regular embroidery files, you can open a multipart VP3 embroidery file, also known as a layered or uncombined file.
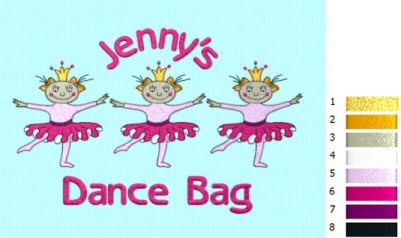
Multipart VP3 embroidery files give you the flexibility to easily remove a layer or alter one layer at a time without affecting the other layers of the design. At first glance the two files below look the same but they are very different. The first file is a regular embroidery file. The embroidery file is combined together and any matching thread colors have been merged together or ColorSorted. If you wanted to make changes to just one of the dancers it would be a lot of work to separate her out.
In the second file you see that each design layer is separate and with its own color changes. Design # 1 is the dancer on the left. Design # 2 is the middle one. Design # 3 is the dancer on the right and Design 4 is the lettering.
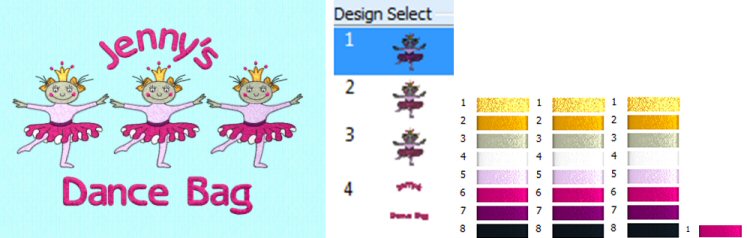
Using the multipart embroidery file you can easily select just the middle dancer, flip her position side-to-side, then emboss and recolor her outfit. You may even want to adjust the lettering location by dragging each section around.
The end result is a new design from an old design with very little effort!
Technique Tune-Up
Technique Tune-Up
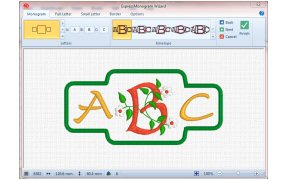
Monogramming is a great way to create a one-of-a-kind gift for yourself or a friend. Using the over 145 fully adjustable, professionally created fonts available in the 6D™ Embroidery System, your possibilities are endless! You can create traditional or contemporary one, two or three letter monograms so easily with the ExpressMonogram Wizard.
In 6D™ Embroidery / Embroidery Extra the ExpressMonogram Wizard can be found on the Wizard Tab  . The ExpressMonogram Wizard has a whole new look.
There are no longer pages to turn, but a Ribbon Bar across the top. This new layout allows you to adjust only the items you need to for your monogram.
In 5D™ Embroidery / Embroidery Extra the Wizard is located on the left side of the work area
. The ExpressMonogram Wizard has a whole new look.
There are no longer pages to turn, but a Ribbon Bar across the top. This new layout allows you to adjust only the items you need to for your monogram.
In 5D™ Embroidery / Embroidery Extra the Wizard is located on the left side of the work area  . In the 4D™ Embroidery System the Wizard was an add-on product.
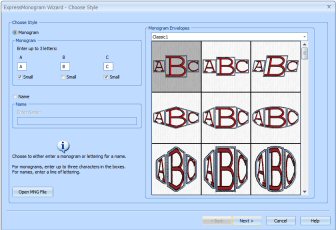
In the 6D™ Embroidery System ExpressMonogram Wizard, you start on the Monogram Tab. Make any desired changes to the Letters and Envelope (layout),
then either click Next  or select any other tab to continue.
Keep moving from tab to tab as desired. When you are finished, click Finish
or select any other tab to continue.
Keep moving from tab to tab as desired. When you are finished, click Finish  and your monogram is ready to sew.
If using a multi-letter monogram style and you want the small letters to be the same font, simply go to the Small Letter Tab and deselect the Alternate Style option.

If you don't want a border around your Monogram, deselect the Border option on the Border Tab.

The ExpressMonogram Wizard will remember the settings used in the last monogram created until you go to Configure and Reset All Modules. In 6D™ Embroidery / Embroidery Extra you can also create quick monograms from the same font directly on the work area using the Individual lettering options.
When using the 5D™ / 4D™ ExpressMonogram Wizard you have similar options for envelope shapes and border tools but there are fewer fonts to pick from. You will also need to move page by page through the Wizard, clicking Next each time, until the last page where you can click Finish.
 QuiltDesign Creator
QuiltDesign Creator
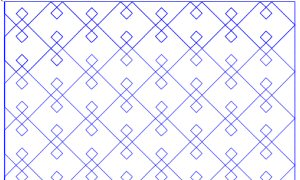
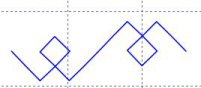
Did you know you can create a Motif, then save it to My Motifs for future use? A Motif is a 4QB file that starts and stops on the same horizontal position, allowing it to keep repeating. Let's look at how to create a motif and use it in a quilting design.
Create a drawing using your favorite drawing tool located in the Create tools  area.
Use Freehand Draw
area.
Use Freehand Draw  or Polygon Draw
  to trace over an image. Once finished,
click Export to My Motifs
to trace over an image. Once finished,
click Export to My Motifs  .
.
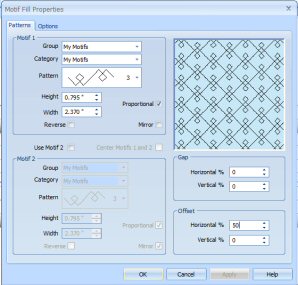
You can now use your new motif as a Motif Fill  to flood fill in a shape or as
a Motif Line
to flood fill in a shape or as
a Motif Line  for a border or single row of motifs. To make a Motif Filled shape, select Standard Line and Motif Fill .
Click Fill Options
for a border or single row of motifs. To make a Motif Filled shape, select Standard Line and Motif Fill .
Click Fill Options  . Set the Group and Category to My Motifs. Select your Motif for the Pattern. Change the Size, Gap and Offset of the design as you desire, then click OK.
Select a shape from the shapes
. Set the Group and Category to My Motifs. Select your Motif for the Pattern. Change the Size, Gap and Offset of the design as you desire, then click OK.
Select a shape from the shapes  drop-down list, then draw your shape. When you release the shape tool, you will see your shape filled with the motif of your choice.
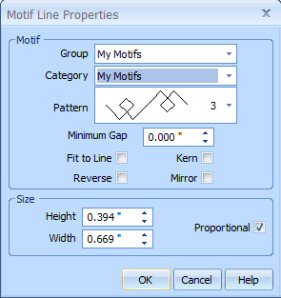
To create a border from your motif, set Lines to Motif Line . Click Line Options . Set the Group and Category to My Motifs. Select your Motif for the Pattern.
Change the Size as desired, then click OK to accept the settings. Select either Freehand
or Polygon Draw to create your border.
Motifs can be large or small depending on how you will be using them. Larger motif patterns 100mm / 4" tall or wide are likely to be used when the stitching is going to be on an automated quilting system. Smaller motifs are usually used for stitching on an embroidery machine. Since you are the designer, enjoy playing with motifs!

Fun Facts to Know and Tell
Did you know that you can create your own Embossing Stamps for use in 6D™ / 5D™ Stitch Editor Plus? Use the Draw Tab in 6D™ / 5D™ Design Creator to draw your pattern, then save it as a .4QB file. This artwork file can then be loaded as a stamp on the Embossing Tab in 6D™ / 5D™ Stitch Editor Plus.
Best wishes from 6D™
P.S. Watch for next month's newsletter for tips on using the Endless function and creating your own repeating embroidery designs.
P.P.S. Check out the Learning Center for a new video on smart lettering features in the 6D™ Embroidery System.

VANTAGE™ Embroidery Software Support is a membership program which provides education and support of the HUSQVARNA VIKING® & PFAFF 6D™, 5D™ and 4D™ Embroidery Systems, QuiltDesign Creator and TruEmbroidery™ Software for Mac® computers. The VANTAGE™ program is currently available in the US, Canada, and Australia. Please visit your authorized HUSQVARNA VIKING® or PFAFF® dealer to learn more and sign up today.
This month with VANTAGE™ Embroidery Software Support features Mastering Your Embroidery Software: "Reverse It: Creating Reverse and Ragged Edge Appliqué". In the Technology Corner, VANTAGE™ members will explore "Troubleshooting Tools that Everyone Can Use".
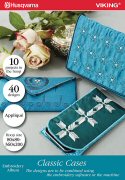
#273 Classic Cases (920399096)
Create beautiful cases for your smart phone, tablet or glasses. You can also use this collection to embellish your garments. This HUSQVARNA VIKING® collection (available this month) includes 10 projects in the hoop and 40 designs which can be used as they are or combined. Hoop sizes vary from 80mmx80mm to 360mmx200mm.
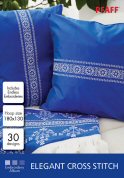
#473 Elegant Cross Stitch (821070096)
Update your closet and home with these wonderful, traditional-looking cross stitch embroideries. This PFAFF® collection (available this month) includes both endless and single embroideries that can easily be combined. When embroidering, use the creative™ METAL HOOP (180mmx130mm / 5"x7").