
Inspired Icons
Inspired Icons
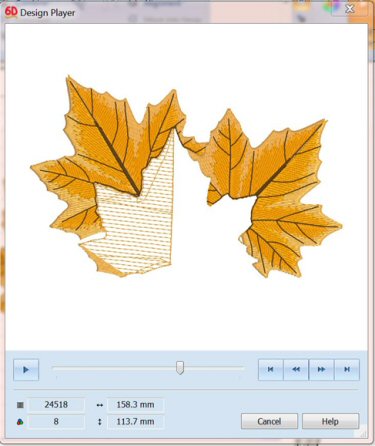
Would you like to see how your embroidery design will stitch out before you actually stitch it? Design Player is a useful tool to see where appliqué lines are, where overlapped designs have stitches removed, and where there are jump stitches.
All parts of the embroidery project that are within the hoop area are shown, whether or not they are selected. Designs are shown in 3D. The current Optimize for Sewing settings from 6D™ Configure are used.
The bottom portion of the window shows information about the design as it will be exported. The controls allow you to jump to the first stitch or last stitch, to vary the speed of the play forwards or backwards, and to pause or rewind the play.
To Select the Design Player
- Quick Access Toolbar or Home Tab:

- Keys: Ctrl + J; Alt, H, J; Alt, 9
The Design Player can be found in the 6D™ Embroidery, 6D™ Extra, 6D™ Card Shop, 6D™ Design Aligner, 6D™ PhotoStitch, 6D™ Sketch, and 6D™ Design Creator modules. In the 5D™ and 4D™ software systems the Design Player can be found in Stitch Editor/Plus modules and works similar to the 6D™ Stitch Editor Plus Design Player, in that overlap is not removed.
Module Mystique
Module Mystique
6D™ Design Creator is the module to create the perfect embroidery with unlimited design possibilities. Simply create designs automatically from your own pictures with ExpressDesign wizards, and then transform them into masterpieces.
A huge number of special effects available in the Design Creator program, such as multicolor gradient fill, specialty fills, cutwork needles, appliqué, and more help you create eye-catching designs!
Load raster or vector images and adjust them as desired with the drawing tools (in 6D™ or 5D™), or use raster images and painting tools (in 6D™, 5D™ or 4D™) to guide you in the design process. A streamlined manual creation process still gives you total control: trims, movement and tie stitches are added automatically in 6D™.
Embroider your imagination with lace features such as Richelieu bars and crosshatch fill or flowing layers of MultiWave fill (added in 5D™). The Echo fill feature (added in 6D™) automatically generates a shadow effect with perfect, adjustable lines. Hundreds of specialty fill pattern options include contour, radial, spiral, shape, QuiltStipple and more.
In 6D™ Design Creator, you can choose from one of 75 shapes to use any way you wish: fill, line, and appliqué. Embellish designs with your own machine stitch motifs or design your own motifs.
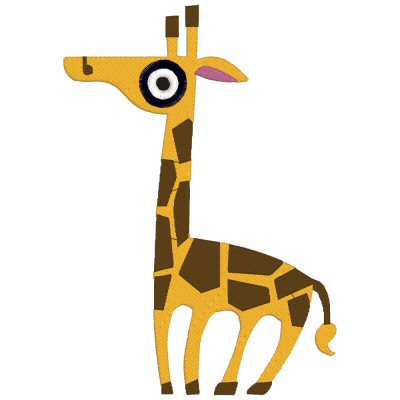
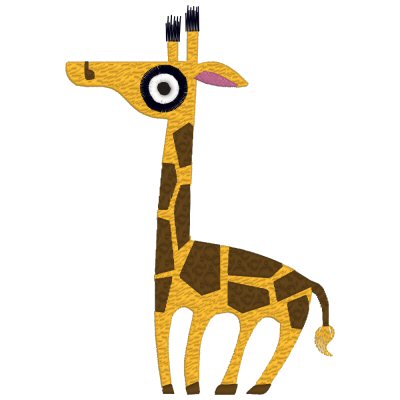
The first design is what you can do in the Embroidery Extra module with the ExpressDesign Wizard. The second design is what you can do in the Design Creator module with the ExpressDesign Wizard and then make it better with the same clipart. Isn't he cute!
Technique Tune-Up
Technique Tune-Up
When you run clipart through the ExpressDesign Wizard in 6D™, 5D™ or 4D™ Design Creator, have you noticed all the circles and squares along an object and wondered what the difference is? There are some easy ways to explain the difference.
In general, objects using round points are curved, and objects using square points are straight. The outlines defining most types of lines and areas can have both curved and straight sections:
- To have any curves, a line must be defined by at least four points.
- To have any curves, an area must be defined by at least three points.
- The first and last pairs of points for a continuous column are always square.
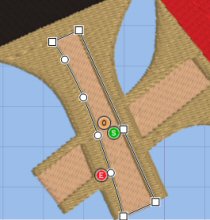
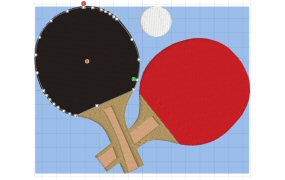
For example, the left side of the tennis racket inner stripe shows how the sequence of round vs square points change the shape of the line. The bottom, top, and right sides are a straight line, while the left side of the stripe is curved.
To change a round point to a square point, hold down the Shift key and click the point without moving it. This is useful if, for instance, a point was not added as a corner at the desired place on a fill area or stitch line. When adjacent points are square, the line between them will be straight.
Change a square point to a round point by clicking the point without moving it. There must be at least two round points next to each other to make a line curved.
 QuiltDesign Creator
QuiltDesign Creator
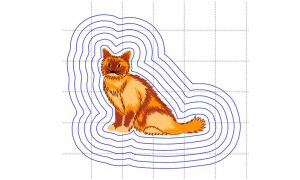
Do you have that perfect embroidery design you want to echo quilt around, but don't want to free-motion quilt? It is easy to add echo lines around a quilting design in QuiltDesign Creator.
First, start a new element that is bigger than your embroidery design. Open that design into the center of the design area. Draw the first echo line with the
Polygon Draw  tool using No Line
  and the Echo Fill
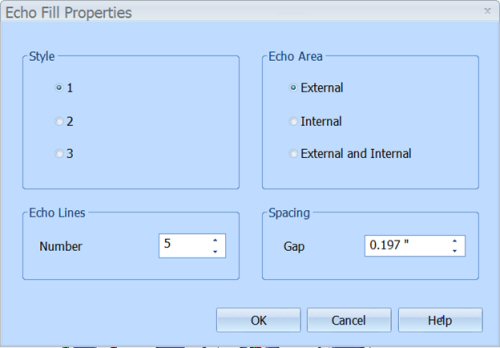
  . Click Options if you want to change the spacing between line or the number of lines before using the Polygon Draw tool.
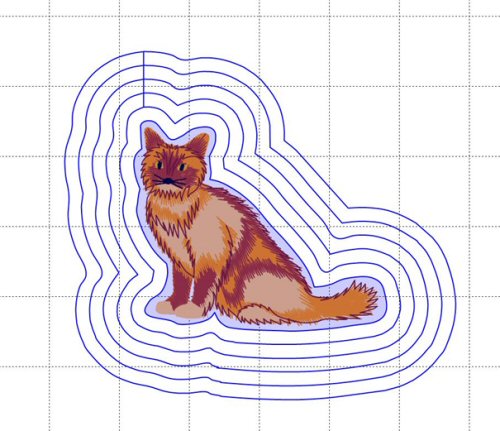
If you plan to stitch it out on an automated quilter, you would leave the connecting lines as pictured below. Delete the embroidery before you Export as a Quilting Design  .
You would use the tools on your automated quilter to ensure the design is in the quilt area before quilting.
.
You would use the tools on your automated quilter to ensure the design is in the quilt area before quilting.
If you plan to quilt after embroidery, you would remove those connecting lines with the cut  and delete tools
  .
You would also select then delete the embroidery before Exporting as Embroidery Design
.
You would also select then delete the embroidery before Exporting as Embroidery Design  . Load
the embroidery and quilting design at your embroidery machine. Stitch out the embroidery. Add batting and backing under the hoop, and then stitch out the echo quilting.
. Load
the embroidery and quilting design at your embroidery machine. Stitch out the embroidery. Add batting and backing under the hoop, and then stitch out the echo quilting.
Fun Facts to Know and Tell
Did you know that free-standing lace can easily be created in 6D™ Design Creator? Form the design quickly using a crosshatch fill in one of 75 shapes, drawing shape and then embellish with candlewicking motifs to add dimension.
Best wishes from 6D™
P.S. We are delighted to announce six new complimentary SuperDesign Sets for 6D™ Embroidery System owners: Baseball, Christmas, Dinosaurs, Fish, Football and Halloween. Click the Smart Update button in 6D™ Configure to download your 54 new SuperDesigns!
P.P.S. Watch for the 6D™ newsletter next month as we look at the Polygon Draw tool and also the Design Aligner module!

VANTAGE™ Embroidery Software Support is a membership program which provides education and support of the HUSQVARNA VIKING® & PFAFF 6D™ and 5D™ Embroidery Systems, QuiltDesign Creator and TruEmbroidery™ Software for Mac® computers. The VANTAGE™ program is currently available in the US, Canada, and Australia. Please visit your authorized HUSQVARNA VIKING® or PFAFF® dealer to learn more and sign up today.
This month with VANTAGE™ Embroidery Software Support features Mastering Your Embroidery Software: "Hints and Tips for Free-standing Lace". In the Technology Corner, VANTAGE™ members will explore "Back It Up".
#280 Organic Creations (920408096)
You'll find 20 amazing felting embroideries for multilayered fabric in this HUSQVARNA VIKING® collection (available next month). Embellish your clothes, blankets, cushions or make lovely table mats for your table setting. This collection is digitized to be embroidered with the Felting Embroidery Set (sold separately as an accessory). Designs fit the 180mmx130mm hoop.

#479 Embroidery Felting (920418096)
Embellish your clothes, create amazing decorations for your home or make beautiful bracelets and necklaces with these 32 awesome embroideries for the new creative™ Felting Embroidery Set. Hoop sizes for this new PFAFF® collection (available next month) range from the creative™ PETITE SQUARE HOOP 80x80mm up to the creative™ DELUXE HOOP 360mmx200mm.