
Inspired Icons
Inspired Icons
Trying out different View Modes can be very helpful in using your embroidery software. In 6D™ Embroidery Extra you can use View Mode in the View tab to toggle between
3D View  , Realistic 3D
  , and
2D View
, and
2D View  stitch display.
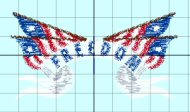
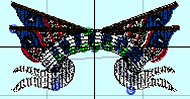
Stitches are automatically displayed in 2D when you select the Edit tab. Use 2D to see the individual stitches with no shading. Use standard 3D View to see how the embroidery will be stitched out with three-dimensional shading. Use Realistic 3D to view embroideries and a background, if present, in 3D without selection boxes, grid or hoop.
Use 2D View to view the individual stitches in embroideries with no shading.
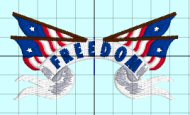
Use 3D View to view embroideries and background in standard 3D mode. All editing functions are available, and the selection box is shown.
Use Realistic 3D , as in the picture at the top of the page, to view embroideries and background in 3D without selection boxes, grid or hoop. You can use the zoom commands,
but editing functions are not available.
In 6D™ Stitch Editor Plus click on to toggle between 2D View and 3D View.
In 3D View the real hoop is shown, with blue corners showing the stitch area within the hoop.
Movement stitches are hidden. The background texture is shown, if it is selected in 6D™ Configure. The design view is the same as in 6D™ Embroidery Extra.
In 2D View , the hoop size is shown by a blue outline with bold corners. Stitches are drawn in plain colors only, and stitches using multicolor threads are drawn using only the first color in the
thread definition. Movement stitches are shown as dotted lines. The background does not use texture in 2D view. In 2D view, black dots or small black squares show the stitch points (needle insertions)
into the fabric. The display of the stitch points, whether they are dots or squares, depends on the zoom level. Showing the stitch points may be helpful for inserting new stitches or moving individual stitches.
The stitch points can be turned on and off separately in each embroidery.
In 6D™ Design Creator you can toggle between 3D View ,
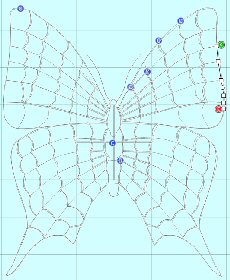
2D View , and Object View  .
The 3D and 2D Views work the same as in 6D™ Embroidery Extra. Object View shows the outline of the objects in the design.
.
The 3D and 2D Views work the same as in 6D™ Embroidery Extra. Object View shows the outline of the objects in the design.
Module Mystique
Module Mystique
Have you ever wondered what this icon  in the QuickLink toolbar at the bottom of your computer screen does?
The Accessories submenu contains 6D™ Font Digitizing
in the QuickLink toolbar at the bottom of your computer screen does?
The Accessories submenu contains 6D™ Font Digitizing  and
a standalone version of 6D™ QuickFont
and
a standalone version of 6D™ QuickFont  for embroidery machine owners who do not have 6D™ Embroidery.
In the 5D™ and 4D™ Embroidery Systems this is where you would find the communication software for your particular embroidery machine. In the 6D™ Embroidery System those functions are now found by exporting the desired file types and using the Windows® Explorer Plug-In.
Technique Tune-Up
Technique Tune-Up
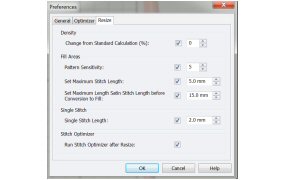
You can resize in the 6D™ Embroidery Extra module, but for more control it is recommended to go to 6D™ Stitch Editor Plus. You can adjust the settings affecting how a design is resized by changing the settings in Preferences. These features are also available in the 5D™ Embroidery System.
To change the Density from Standard Calculation (%) will force the density to vary from the original density. It can be useful to set this to a negative value when making an embroidery much smaller than the original. If you want to change the type of fabric you stitch on, the Density setting is terrific to get more coverage on a towel or less dense on a light-weight fabric with a purchased design.
For Fill Areas you can change the Pattern Sensitivity. Increasing the Pattern Sensitivity value will improve the recognition of patterns that are hard to identify. If a fill area contains an unrecognized pattern, a flat fill pattern is used.
Set Maximum Stitch Length limits the maximum stitch length in fill areas in the resized selection. This is mainly used when making a selection larger. Set Maximum Satin Stitch Length before Conversion to Fill compares the average length of stitches to this setting. If the stitches would be larger than this value after resizing, the satin block is converted to a fill area.
Single Stitch Length sets the stitch length for running stitch and single stitches. The stitch curve is recalculated, which can improve the appearance of outlines. When enlarging designs, this prevents long untidy stitches. When making designs smaller, this helps curves and shapes stay accurate, although small details may be partially lost to prevent stitches from becoming too small and dense.
Run Stitch Optimizer after Resize to automatically optimize the embroidery after it has been Resized. This will improve the quality of the resized embroidery when it is stitched out.
In 6D™ Embroidery Extra the resizing will tend to add more stitches, to ensure that you get good coverage when increasing design size without fine control. The settings in 6D™ Stitch Editor Plus Preferences allow you to have better control over the density and pattern sensitivity when resizing.
The top design is from the samples folder Leaves in 6DEmb/Stitch2. It is about 6" wide by 1-1/4" high. To stitch this design on the bottom of a towel, it should be denser to cover the terry cloth. To do that, you can resize the design setting the density in Preferences to 25%. The lower design was also made a bit bigger, 112%, to make it 1-1/2" tall. The resized design is now almost 7" wide and has a denser fill pattern to cover the terry cloth.

 QuiltDesign Creator
QuiltDesign Creator
In previous newsletters we’ve looked at how to create a Motif and how to use Motifs as a fill. This month we will look at how to use Motifs in a line.
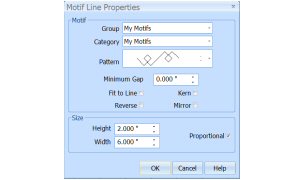
Motif Line  is the tool we use to create a motif line of stitching.
Click the options
is the tool we use to create a motif line of stitching.
Click the options  to set the properties and the Motif Line Properties dialog box appears.
Click the drop-down arrow to select the desired group of motif patterns, Universal or MyMotifs. Select the desired category of motif patterns. Then select the desired motif visually.
Once you have selected the motif, then you can change attributes of the motif line. The Minimum Gap is the minimum amount of extra stitching that is placed between the motifs along the line. This is in addition to any spacing that is part of the selected motif.
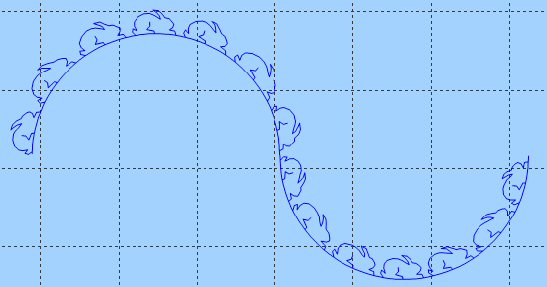
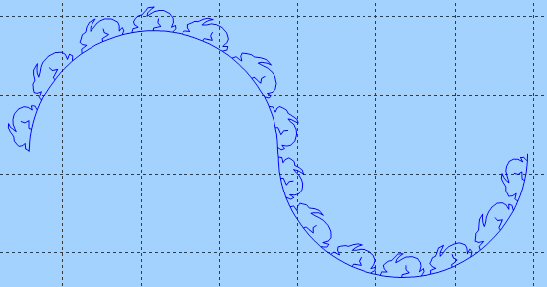
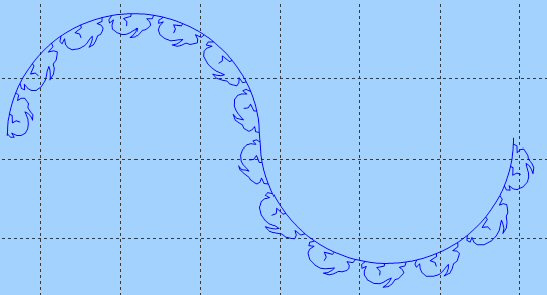
When Fit To Line is off, the ends of each motif are placed on the line. The original curve, in red, is shown under the motif line for illustration purposes only.
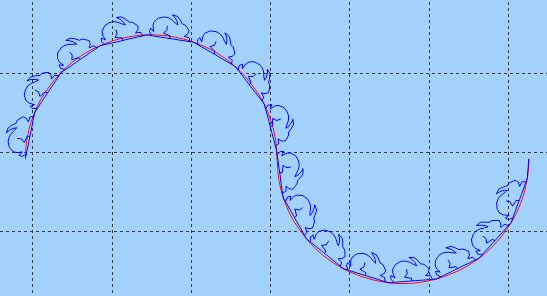
When Fit To Line is on, each whole motif is adjusted to fit along the line. Notice how the motif bends along the line.
Reverse will change the direction of the motif along the line. Kern will automatically increase the space between adjacent motifs so that the motifs fit along the line without overlapping.
Mirror will flip the motif vertically across the line of motifs.
The Height and Width are initially set according to the chosen motif. The maximum and minimum values for Height and Width are individual to each motif. Proportional will keep the relative Height and Width in proportion when either is changed.
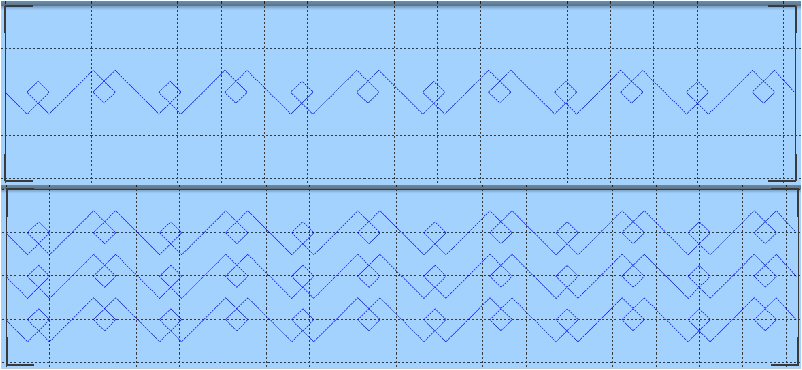
Select your favorite Create tool to draw a line of motifs. Right click to put the tool away. Pictured below is a Motif that we created a few months ago. This Motif in a line makes a very nice nesting edge to edge design.
Fun Facts to Know and Tell
Did you know the Motif Patterns within the E categories and Q categories of QuiltDesign Creator are sized as E for Embroidery and Q for Quilting?
Best wishes from 6D™
P.S. Watch for the 6D™ newsletter next month as we look at the Draw Stitches feature, the ExpressDesign Wizard, MultiWave Fill in 6D™ Design Creator and Alignment Tools in QuiltDesign Creator.

VANTAGE™ Embroidery Software Support is a membership program which provides education and support of the HUSQVARNA VIKING® & PFAFF 6D™ and 5D™ Embroidery Systems, QuiltDesign Creator, TruEmbroidery™ 3 and TruEmbroidery™ Software for Mac® computers. The VANTAGE™ program is currently available in the US, Canada, and Australia. Please visit your authorized HUSQVARNA VIKING® or PFAFF® dealer to learn more and sign up today.