
Inspired Icons
Inspired Icons
With just one click you can now rotate your design 45 degrees, the exact rotation needed to place a design in a corner.
The Rotate 45  feature is new to the 6D™ Embroidery System, and is available in 6D™
Embroidery and 6D™ Stitch Editor Plus.
feature is new to the 6D™ Embroidery System, and is available in 6D™
Embroidery and 6D™ Stitch Editor Plus.
Rotate 45 can be found on the Home tab in 6D™ Embroidery. Select the design, then simply click on the Rotate 45 icon .
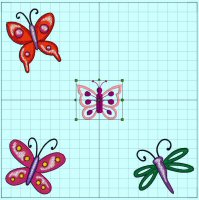
To create a hoop full of butterflies, select three of them from the Samples/6DEmb/Stitch2/Butterflies and Bugs subfolder, then place them in the corners.
Place a fourth butterfly from the Buttonholes 3 Set of SuperDesigns. The buttonhole design would look really nice rotated into the corner.
Select the design, then click Rotate 45 . Move the butterfly into place in the corner; and, for a finishing touch, add some lettering.
Module Mystique
Module Mystique
The Sketch module has been a part of our Embroidery Software system for quite some time now. Let's take a look at how much you can do with the Sketch module and see what's new in the 6D™ Sketch module.
Release your inner artist and "draw" your own stitch paintings. Create embroidery stitches as if you are using a pencil or paintbrush, then print and embroider your masterpiece at the touch of a button. Add free motion embroidery highlights and texture to your favorite pictures, fabrics and designs. Embroider your signature or use the calligraphy feature to create beautiful monograms. You can even create appliqué with horizontal or rotational zigzag satin stitching! Sketch straight or curved lines with the "Standard" stitch creation tools: create perfectly regulated running, triple and motif line plus satin lines of varying width (new to 6D). Trims, Jumps and Tie Stitches are added automatically in 6D™ Sketch, simplifying the creation process tremendously.
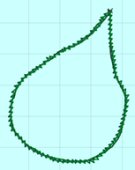
Create the beautiful appliqué leaves pictured above. On the Standard tab, select the Running Stitch  tool. Trace around the leaf to create the placement line.
Change the color, then trace around the leaf again to create the tack-down line. Change the color, then select the
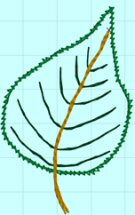
Custom Satin
tool. Trace around the leaf to create the placement line.
Change the color, then trace around the leaf again to create the tack-down line. Change the color, then select the
Custom Satin  tool.
Click Options to change the Width to 1.0mm and the Density to 15. Trace around the leaf to give the raw edge look. Now you can use the Running Stitch or Triple Stitch to add the stem and the veins to the leaf.
The design above can be found in the Stitch subfolder of the Sketch Samples.
tool.
Click Options to change the Width to 1.0mm and the Density to 15. Trace around the leaf to give the raw edge look. Now you can use the Running Stitch or Triple Stitch to add the stem and the veins to the leaf.
The design above can be found in the Stitch subfolder of the Sketch Samples.
Technique Tune-Up
Technique Tune-Up
Command Markers can be found in 6D™ and 5D™ Stitch Editor Plus, 5D™ Stitch Editor, as well as in the 6D™ and 5D™ Design Creator modules. These markers help you understand how designs are put together.
In the Stitch Editor Plus module, on the Design Page, you can view the Color Change, Stop, and
Trim Commands  . On the Modify Page, you can also remove or add those commands.
On the Object Page you can view and change the start  and
end
and
end  markers and the
origin
markers and the
origin  of a fill pattern.
Drag the start or end marker to the point that you wish to use as the new area start or end point. Drop at the desired point.
Some types of fill areas have an origin, marked by an orange circle .
This is used to move the start point for the pattern in a pattern fill, or the center point for Radial fill, Spiral fill and Shape fill types.
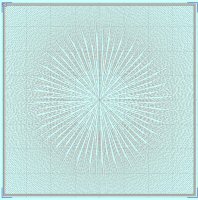
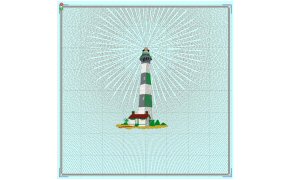
In the Design Creator module, the commands work the same as on the Object Page of the Stitch Editor Plus module. Let's take a look at the effect that moving the origin has on a design. Create a filled square with Radial Fill and Satin Border. The Origin defaults to the center of the object.
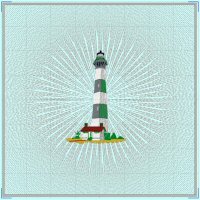
Place a design, like this lighthouse from the Landscapes Folder within the Samples\6DEmb\Stitch2 folder, for one effect. Move the Origin where the light is on the lighthouse, for a completely different effect, as seen in the lighthouse at the start of this section.
 QuiltDesign Creator
QuiltDesign Creator
The Convert to Lines feature allows you to convert the currently selected complex object into normal line objects. Use Convert to Lines to allow fine control of editing, rearranging of stitch order to improve stitch order, and the scaling of motifs within complex objects.
Complex objects include filled areas, parallel and motif lines, Groups, MiniPics and existing designs. For example, when Combine Paths is used to create holes in a fill with overlapping areas, unexpected areas may be filled. This can also happen when creating filled text with a font that has overlapping outlines such as Wingdings.
To edit complex objects manually to remove unwanted parts such as fill areas, or nodes within parallel lines, use Convert to Lines, then edit the individual lines with the editing tools. Another benefit is to obtain different results with motif fill areas. Normally, if you want to resize a motif fill area the motif remains at its original size. If you Convert to Lines, then scale the filled area, the motif size will change with area size.
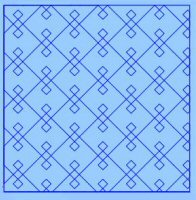
With the object selected, click on the Object menu above the icon bar, then select Convert to Lines. The picture at the start of the section is a square filled with a motif from My Motifs. The middle picture is that filled object expanded to twice the size.
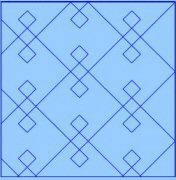
The bottom picture is the original square converted to lines then scaled up to twice the size.
Fun Facts to Know and Tell
Did you know that Trims, Jumps, and Tie Stitches are added automatically for you in the 6D™ Sketch and 6D™ Design Creator modules?
Best wishes from 6D™
P.S. Watch for the 6D™ newsletter next month as we look at View Modes, Resize in Stitch Editor Plus, Accessories QuickLink, and Motif Lines in QuiltDesign Creator.

VANTAGE™ Embroidery Software Support is a membership program which provides education and support of the HUSQVARNA VIKING® & PFAFF 6D™ and 5D™ Embroidery Systems, QuiltDesign Creator, TruEmbroidery™ 3 and TruEmbroidery™ Software for Mac® computers. The VANTAGE™ program is currently available in the US, Canada, and Australia. Please visit your authorized HUSQVARNA VIKING® or PFAFF® dealer to learn more and sign up today.